This is a follow up to my Microsoft Ignite 2017 session NET332. The primary purpose of the session was to demonstrate the ease in which an application with no identity management capabilities could leverage both the Active Directory Authentication Library (ADAL) and the new Microsoft Authentication Library (MSAL) to add authentication functionality to your apps.
Since the resulting code for working with both authentication libraries is what’s important here, please check in at GitHub to grab the final results.

The original application is included in the master branch and the ADAL and MSAL conversions are checked into their own distinct branches.
The Origin
We start our journey with a simple Christmas List application which has no concept of formal identity besides a drop down box to choose whose list we are working on.
From here we have two destinations. The first is to demonstrate the addition of ADAL to incorporate authentication to an Azure AD tenant and the second is to use MSAL to leverage both Azure AD and Microsoft Accounts.
In order to understand how we would choose between these two implementations, we need to understand a little bit about the two eco-systems.
V 1 & V2 Endpoints
Up until recently the authentication endpoints supported only accounts from Azure Active Directory but at Build 2016 the new converged authentication API was introduced to also support Microsoft Accounts. Before this authentication system was released, application developers were required to register two applications, use two separate authentication libraries and connect to two unique endpoints if there was a requirement to support both AAD and MSA. There are documented differences between the two endpoints and the two authentication libraries presented in this article demonstrate unique approaches to using these distinct endpoints.
The new converged authentication APIs do have limitations but the current recommendations are as follows:
- If you want to support personal Microsoft accounts in your application, use the v2.0 endpoint. Before you do, be sure that you understand the limitations that we discuss in this article, especially those that apply to work and school accounts.
- If your application needs to support only work and school accounts, use the original Azure AD endpoints.
Empowered with that information, let’s now take a look at using ADAL against the V1 endpoints and MSAL against the new converged V2 APIs.
Active Directory Authentication Library (ADAL)
Looking at the master branch the original API has a REST method for retrieving the currently assigned gifts and one to add a new gift to the list.
/// <summary>
/// Retrieve a list of gifts for an authenticated giftee.
/// </summary>
/// <returns>An enumerable list of gifts.</returns>
public IEnumerable<GiftItem> Get()
{
	// A user's Xmas list is keyed off of the NameIdentifier claim,
	// which contains an immutable, unique identifier for the user.
	Claim subject = ClaimsPrincipal.Current
		.FindFirst(ClaimTypes.NameIdentifier);

	return from gift in GiftBag
		   where gift.Owner == subject.Value
		   select gift;
}

/// <summary>
/// Add a gift to the list for an authenticated giftee.
/// </summary>
/// <param name="gift">A gift.</param>
public void Post(GiftItem gift)
{
	if (!string.IsNullOrWhiteSpace(gift?.Title))
	{
		string owner =
			ClaimsPrincipal.Current.FindFirst(ClaimTypes.NameIdentifier).Value;

		GiftBag.Add(new GiftItem
		{
			Title = gift.Title,
			Owner = owner
		});
	}
}
The OWIN pipeline now takes care of authenticating the user and this can be accessed via the ClaimsPrincipal to key the Xmas list. In order to take the leap we need to load the OWIN security middleware from nuget:
Install-Package Microsoft.Owin.Security.OAuth
Install-Package Microsoft.Owin.Host.SystemWeb
Install-Package Microsoft.Owin.Security.ActiveDirectory
Add a Startup.Auth partial class with a ConfigureAuth method and the Startup.cs class that will be called by Katana. These classes can be found in the sample code but the ConfigureAuth will look like this:
// For more information on configuring authentication, please visit http://go.microsoft.com/fwlink/?LinkId=301864
public void ConfigureAuth(IAppBuilder app)
{
    app.UseWindowsAzureActiveDirectoryBearerAuthentication(
        new WindowsAzureActiveDirectoryBearerAuthenticationOptions
        {
            Tenant = ConfigurationManager.AppSettings["ida:Tenant"],
            TokenValidationParameters = new System.IdentityModel.Tokens.TokenValidationParameters
            {
                ValidAudience = ConfigurationManager.AppSettings["ida:Audience"]
            }
        });
}
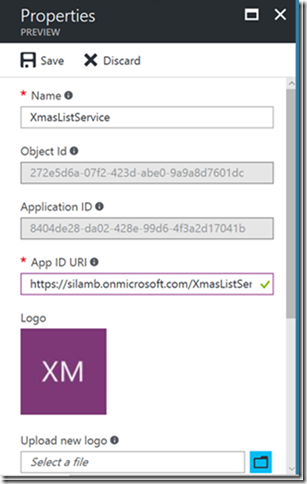
Go to the Azure portal and create a new App Registration in your Azure Active Directory blade:
Once this has been created, open the properties and update Web.Config. The tenant and audience should be the tenant name and the App ID URI respectively.
Next we need to update the client application to use ADAL by loading it from nuget:
Install-Package Microsoft.IdentityModel.Clients.ActiveDirectory
We will need to update the App.xaml.cs to have the properties from our newly created App Registration:
//
// The Client ID is used by the application to uniquely identify itself to Azure AD.
// The Tenant is the name of the Azure AD tenant in which this application is registered.
// The AAD Instance is the instance of Azure, for example public Azure or Azure China.
// The Authority is the sign-in URL of the tenant.
//
public const string Tenant = "<AZURE AD TENANT>.onmicrosoft.com";
public const string ClientId = "<APP ID>";
public const string AadInstance = "https://login.microsoftonline.com/{0}";
public static string Authority = string.Format(CultureInfo.InvariantCulture, AadInstance, Tenant);

public const string XmasListResourceId = "<APP ID URI>";
The sample code has a modified MainPage.xaml and MainPage.xaml.cs that replaces the ComboBox with a TextBox and button to initiate the login and show the result.
The Windows Store application requires a special callback URI that can be obtained by placing a breakpoint on the following line and running the application:
_redirectUri = Windows.Security.Authentication.Web.WebAuthenticationBroker.GetCurrentApplicationCallbackUri();
Record this callback URI and create a new native App Registration:
This msapp:// style URI should be then added as a redirect URI to the newly created application.
We also need to delegate permission from this new Native App Registration to use our Web API App Registration:
The actual authentication process is taken care of by the following line which uses the special Callback URI:
result = await _authContext.AcquireTokenAsync(App.XmasListResourceId, App.ClientId, _redirectUri, new PlatformParameters(PromptBehavior.Auto, false));
The resulting token is then set as the default authorization header for all subsequent requests:
_httpClient.DefaultRequestHeaders.Authorization = new AuthenticationHeaderValue("Bearer", result.AccessToken);
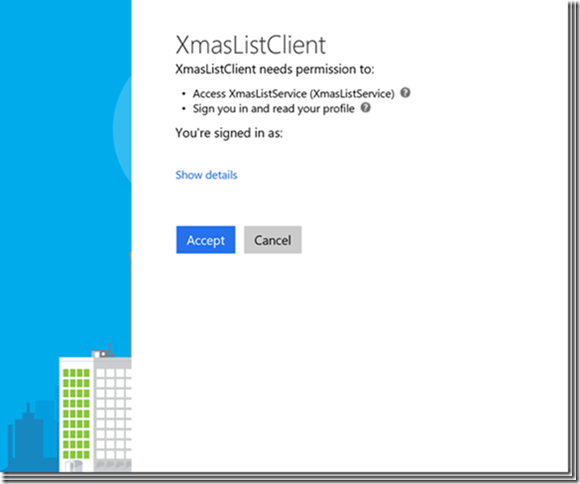
Now simply spin up the Web API and the Native application and login. You should encounter the standard OAuth experience where you are asked to verify permission in order to grant consent:
Once this is complete you will be logged in and can add gifts until your heart is content:
That’s it! We now have a working authentication scheme in our application and to summarise these are the steps we had to perform:
- Update the Web API to use OWIN to capture the security context
- Create a new App Registration for the Web API and update Web.Config with the settings.
- Update the client to use ADAL and modify the UI to login rather than use the ComboBox control.
- Create a new App Registration for the Native client and update its return URL with the special callback URI.
- Delegate permissions to the XmasListService
- Update the client application with the settings from the new Native Client App Registration and add the authentication logic that was included with the sample.
Not too shabby. Next we tackle the converged API. Buckle up…
Microsoft Authentication Library (MSAL)
If we go back to our master branch we can now perform the equivalent steps required to use MSAL in our application. We can use the exact same code in our XmasListController as the token will still contain the NameIdentifier we will use to key our christmas list. Instead we need to add some different nuget packages:
Install-Package Microsoft.Owin.Host.SystemWeb
Install-Package Microsoft.Owin.Security.Jwt
Install-Package Microsoft.Owin.Security.OpenIdConnect
Once again we need to add a Startup .cs and a Startup.Auth.cs but this time the ConfigureAuth method looks a little different:
// For more information on configuring authentication, please visit http://go.microsoft.com/fwlink/?LinkId=301864
public void ConfigureAuth(IAppBuilder app)
{
    var tvps = new TokenValidationParameters
    {
        // The web app and the service are sharing the same clientId
        ValidAudience = ConfigurationManager.AppSettings["ida:Audience"],
        ValidateIssuer = false,
    };

    // NOTE: The usual WindowsAzureActiveDirectoryBearerAuthenticaitonMiddleware uses a
    // metadata endpoint which is not supported by the v2.0 endpoint.  Instead, this
    // OpenIdConenctCachingSecurityTokenProvider can be used to fetch & use the OpenIdConnect
    // metadata document.

    app.UseOAuthBearerAuthentication(new OAuthBearerAuthenticationOptions
    {
        AccessTokenFormat = new JwtFormat(tvps, new OpenIdConnectCachingSecurityTokenProvider("https://login.microsoftonline.com/common/v2.0/.well-known/openid-configuration")),
    });
}
The initialisation logic requires a special class which is available from several repositories such as this one and this class needs to be added to the project as well.
As this application will use the new converged API experience we need to register it in the new Application Registration Portal. In this portal you can see any old Live SDK registrations as well as any applications using the V2 endpoints.
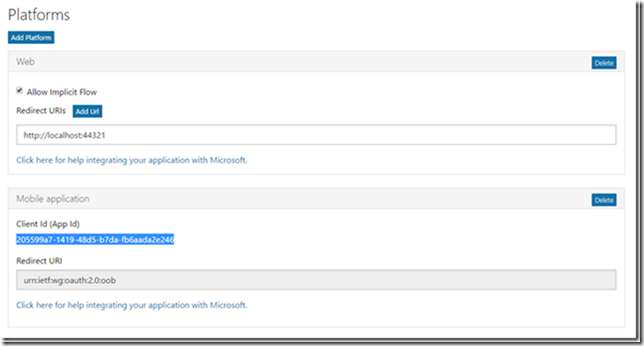
Add an application and create both a Web platform for the API and a Mobile application (It seems if it’s not web its mobile!) to represent the Native client.
All we really need is both the Application ID and the Client ID and we’re off to the races. In the sample code for the API the application ID is stored in the Web.Config. We simply fill the ida:Audience configuration setting with the Application ID so it can be used in ConfigureAuth method shown above:
  <appSettings>
    <add key="webpages:Version" value="3.0.0.0" />
    <add key="webpages:Enabled" value="false" />
    <add key="ClientValidationEnabled" value="true" />
    <add key="UnobtrusiveJavaScriptEnabled" value="true" />
    <add key="ida:Audience" value="APPLICATION_ID" />
  </appSettings>
In the client, MSAL makes this a lot easier than ADAL. First we need to add the MSAL nuget package which is currently available as a pre-release:
Install-Package Microsoft.Identity.Client -Pre
Once again the sample code has a modified MainPage.xaml and MainPage.xaml.cs that replaces the ComboBox with a TextBox and button to initiate the login and show the result. We need to specify the ClientId constant in the App.xaml.cs as this is all the MSAL client requires to spin up a security context:
public const string ClientId = "CLIENT_ID";
If we use the Then the PublicClientConnection from MSAL can be used to retrieve a token:
result = await _authContext.AcquireTokenAsync(new[] {App.ClientId});
In the same way as before the default authorization header can be specified:
_httpClient.DefaultRequestHeaders.Authorization = new AuthenticationHeaderValue("Bearer", result.Token);
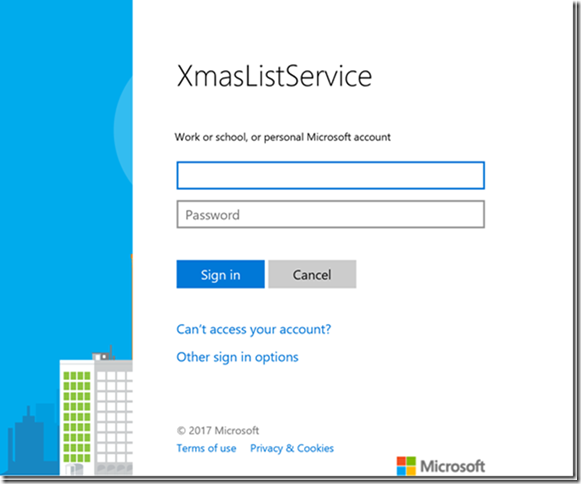
If we then spin up the service and client, upon login we will be presented with a slightly different login dialog:
We notice that we are now presented with the option of either an Azure AD account or a Microsoft Account and if we authenticate using the latter the equivalent permission screen is displayed:
The end result is a Christmas list keyed off my Microsoft Account rather than an organizational one:
That’s a wrap! Let’s review the steps required which I consider a lot simpler if you can live with the limitations of the V2 endpoint:
- Update the Web API to use OWIN to capture the security context
- Create a new App Registration in the new apps.dev portal and add a platform for both the Web API and the Native application. Update Web.Config with the Application ID.
- Update the client to use MSAL and modify the UI to login rather than use the ComboBox control.
- Update the client application with the Client ID from the new Native Client platform and add the authentication logic that was included with the sample.
Over time the limitations should be removed and the V2 endpoint should become the sole API for authentication so think carefully about whether it is right for you.
Hopefully this article has clarified exactly what is required to take your application from zero to hero if you need to add identity management whether it be Azure AD, Microsoft Accounts or now both…


