In my last post I commenced my journey to integrate our old deployment process with the new shiny VSTS Release Management system. The whole story was about leveraging processes that were already working for us and the flow looked something like this:
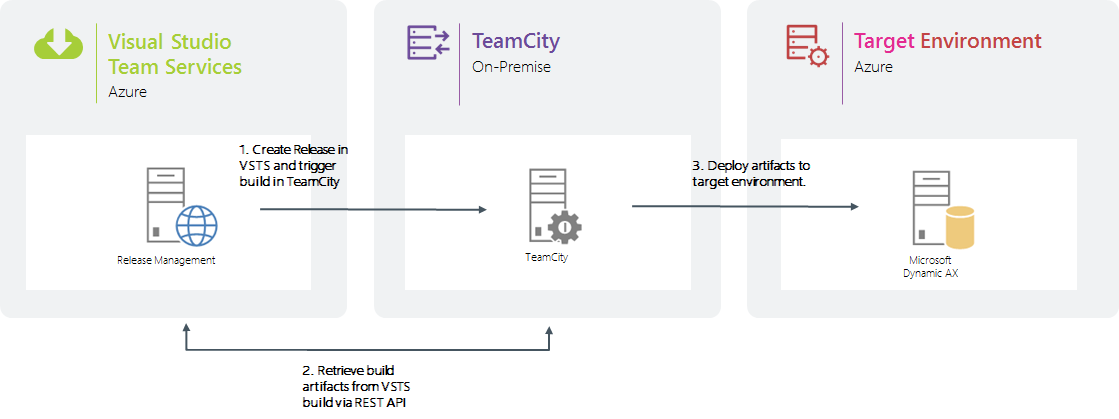
The previous step in the process involved getting TeamCity to grab the build output from VSTS and deploy it using our old deployment PowerShell. With this working, my next goal was to be able to trigger the whole process from Release Management so I could either pick the build I wanted to deploy or trigger it from a successful build in VSTS.
I thought, this is going to be mad easy.
Alas, it turned out to be a little more difficult…
The challenge was that I needed to call the TeamCity REST services and to do that I needed some PowerShell that looked something like the following:
param (
[string]$BuildId,					        # The id of the build in VSTS
[string]$BuildDefinition,					# The name of the build
[string]$BuildName,						# The version of the build
[string]$TeamCityBuildId					# The id of the build in TeamCity
)

function Execute-HTTPRequestCommand() {
    param(
        [string] $url,
        [string] $username,
        [string] $password,
        [string] $data
    )

    $authInfo = $username + ":" + $password
    $authInfo = [System.Convert]::ToBase64String([System.Text.Encoding]::Default.GetBytes($authInfo))

    $request = [System.Net.WebRequest]::Create($url)
    $request.Headers["Authorization"] = "Basic " + $authInfo
    $request.PreAuthenticate = $true

    $request.Method = "POST"
    $request.ContentType = "application/xml"

    $content = [System.Text.Encoding]::Default.GetBytes($data)
    $request.ContentLength = $content.Length

    $postStream = $request.GetRequestStream()
    $postStream.Write($content, 0, $content.Length)
    $postStream.Dispose()

    $response = $request.GetResponse()
    $reader = [IO.StreamReader] $response.GetResponseStream()
    $output = $reader.ReadToEnd()

    $reader.Close()
    $response.Close()

    $output
}

function Get-TriggerBuildData() {
    param(
        [string] $buildId,
        [hashtable] $params
    )

    $paramsString = ""
    ForEach($entry in $params.GetEnumerator()) {
        $paramsString += ""
    }

    #Write-Output $params.Count

    If ($params.Count -gt 0) {
        $paramsString = "$($paramsString)";
    }

    $result = "$($paramsString)"

    $result
}

function Execute-TeamCityTriggerBuild() {
    param(
        [string] $buildId,
        [hashtable] $params
    )
    $userName = ""
    $password = ""
    $server = ""
    $url = "$($server)httpAuth/app/rest/buildQueue"

    $data = Get-TriggerBuildData $buildId $params

    $output = Execute-HTTPRequestCommand $url $userName $password $data
}

Execute-TeamCityTriggerBuild $TeamCityBuildId @{ "BuildId" = "$BuildId"; "BuildDefinition" = "$BuildDefinition"; "BuildName" = "$BuildName" }
In the script above I only really needed to pass the BuildId which was used to grab the artifacts from VSTS but I passed the BuildName and BuildDefinition just so I could log them in TeamCity to establish a better audit trail.
With my sweet little PowerShell script in hand I hit the magic little RELEASE link in VSTS and created a new release definition. Since it was going to be a simple task I chose to start with an empty definition and chose the project and build definition to associate the release with. I elected to use the Hosted agent queue to execute my release tasks. When I clicked Create I was presented with a workspace that allows me to customise my deployment process.
The first thing to note is the box that says Environment 1. As described in this Channel 9 episode: Environments, (With Donovan Brown and David Tesar) we probably shouldn’t think of an environment as a physical machine. In the VSTS universe its actually just a collection of properties including approval schemes, variables, agent pools and the actual tasks that make up the “deployment”.
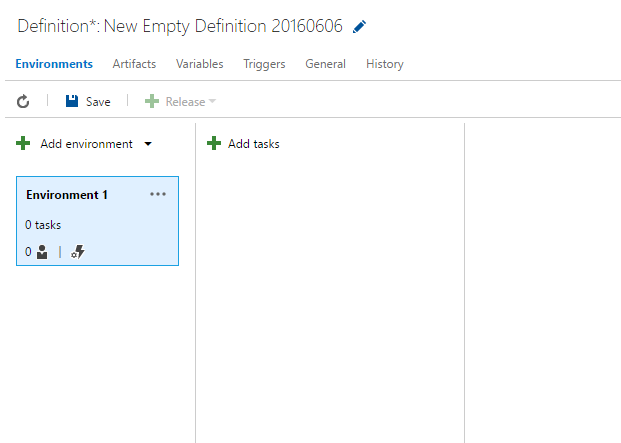
With that in mind, I just renamed it to something friendly and created a task inside it to run my Powershell script. That’s where the fun started. I chose the PowerShell task and started configuring it to run my script above. I had two immediate choices for where to source my script from: File Path or Inline Script. The first choice allowed me to choose from the associated build artifacts but my PowerShell script was a meta acitivity and I definitely didn’t want to include it there just so I could execute it. The second option to include it inline seemed like the logical choice but there’s a size limit and my script wouldn’t fit in there.
Hmmmm… I’m not bowing out that easily so let’s write a custom build task…
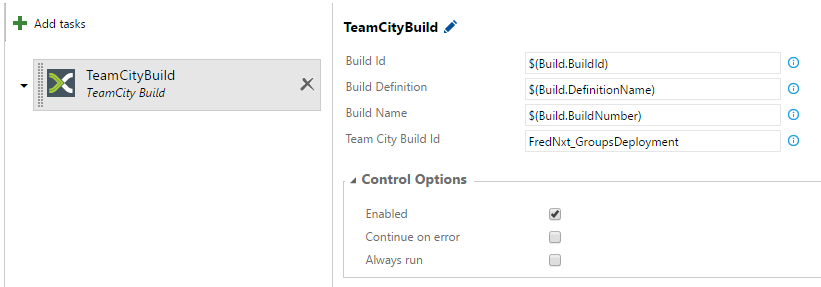
Thanks to Developing a Custom Build vNext Task series by Colin Dembovsky I was able to put together a build task pretty quickly to enable me to trigger the TeamCity build. As an added bonus, the build task provides a first class interface to allow users to configure the task with more guidance than purely executing a Powershell script.
The easiest way to start building your task is to first use tfx-cli to create the scaffolding. This utility sorts out a manifest files, an icon and either a Powershell or Node.JS script. (or both)
The first step is customise the manifest to instruct VSTS as to what the input parameters should be for the build task.
{
  "id": "aaaaaaaa-aaaa-aaa-aaaa-aaaaaaaaaaa",
  "name": "TeamCityBuild",
  "friendlyName": "TeamCity Build",
  "description": "Trigger a build in TeamCity",
  "author": "Simon Lamb",
  "helpMarkDown": "This task will execute a Team City build.",
  "category": "Build",
  "visibility": [
    "Build",
    "Release"
  ],
  "demands": [],
  "version": {
    "Major": "0",
    "Minor": "1",
    "Patch": "0"
  },
  "minimumAgentVersion": "1.95.0",
  "instanceNameFormat": "TeamCityBuild $(message)",
  "inputs": [
    {
      "name": "BuildId",
      "type": "string",
      "label": "Build Id",
      "defaultValue": "",
      "required": true,
      "helpMarkDown": "The Id of the build in VSTS to retrieve artifacts for deployment."
    },
    {
      "name": "buildDefinition",
      "type": "string",
      "label": "Build Definition",
      "defaultValue": "",
      "required": true,
      "helpMarkDown": "The definition name of the build in VSTS."
    },
    {
      "name": "BuildName",
      "type": "string",
      "label": "Build Name",
      "defaultValue": "",
      "required": true,
      "helpMarkDown": "The name of the build in VSTS. This corresponds to the version of the application."
    },
    {
      "name": "TeamCityBuildId",
      "type": "string",
      "label": "Team City Build Id",
      "defaultValue": "",
      "required": true,
      "helpMarkDown": "The Id of the build in TeamCity to execute."
    }
  ],
  "execution": {
	"Node": {
      "target": "Execute-TeamCityBuild.js",
      "argumentFormat": ""
    },
    "PowerShell3": {
      "target": "Execute-TeamCityBuild.ps1",
      "argumentFormat": ""
    }
  }
}
This final result of this manifest will be a neat little interface to configure the build task and the ability to provide extended guidance for the user.
The thing I quickly realised is that the Powershell script is used only if you are executing the release on a Windows based build agent. As I was using the hosted agent, the Node.JS implementation was what I was actually after. Thankfully the second post in Colin’s series gave me the direction I required to pull this off. After a bit of experimentation (and learning enough Node.JS to be dangerous) I came up with the following script.
var tl = require('vsts-task-lib');

var teamCityBuildId = tl.getInput("TeamCityBuildId", true);
var buildId = tl.getInput("BuildId", true);
var buildDefinition = tl.getInput("BuildDefinition", false);
var buildName = tl.getInput("BuildName", false);

var post_data = '' +
    '' +
      '' +
      '' +
      '' +
    '' +
'';

var request = require('request'),
    username = "",
    password = "",
    url = "http:///httpAuth/app/rest/buildQueue",
    auth = "Basic " + new Buffer(username + ":" + password).toString("base64");

console.log("Executing build on TeamCity...");
console.log("Url: " + url);
console.log("Auth: " + auth);
console.log("TeamCityBuildId: " + teamCityBuildId);
console.log("BuildId: " + buildId);
console.log("BuildDefinition: " + buildDefinition);
console.log("BuildName: " + buildName);

request.post({
  url:     url,
  headers : {
            "Authorization" : auth,
            "Content-Type": "application/xml",
            'Content-Length': Buffer.byteLength(post_data)
        },
  body:   post_data
}, function(error, response, body){
  console.log("Response from TeamCity: " + body);
});
With all that in place I could now create a release, point it at any build output and execute it in TeamCity. When the TeamCity build executed it would retrieve the build artifacts from VSTS (As covered in my last post) and perform the deployment as it always had. I could now even trigger the release off a build on our staging branch and deploy directly to one or more QA environments.
In the next post in this series I’ll have a play with the approval workflow and show how I implemented a process that allows our testers to approve the release but have the actual deployment occur later that night. Using multiple environments and some dependencies I was able to trick VSTS into working how I wanted it to…
Happy DevOps!!!
