It’s the last night of Microsoft Build 2016 and I’m in a hotel room looking for something to do. As I’m all hyped up on the Kool-Aid I decided to migrate some of our old school upgrade templates from Team Foundation Server 2013 and drag them kicking an screaming into the now…
We have been building some of our products in Team Foundation Server 2013 for some time using Upgrade Templates. This is basically the old declarative XML way of performing builds and I’m not ashamed to say that I always felt that it was a much more intuitive way of performing builds than the XAML build system. The product I migrated consisted of a few key elements (Traditional .NET Winforms type gear):
- Back-end services running as a Windows Service
- WCF Services
- Winforms UI heavily utilising DevExpress components
- Clickonce deployment of the Winforms UI
- MSI deployment of the whole shebang built using the WiX toolset
To begin I create an empty build definition and configured a couple of variables that I would need throughout the build process. These were the build platform and build configuration that I would be specifying as Any CPU and Release respectively.

I then had a look at our tfsbuild.proj and figured out all of the steps I needed to reproduce with the new VSTS VNext build framework. This included all of the components above as well as versioning of said components using the <major>.<minor>.<juliandate>.<buildincrementalvalue> pattern. The installation included a ClickOnce deployment that had to be versioned appropriately in order to ensure that any clients installed on other machines would automatically deploy once the new service components had been installed.
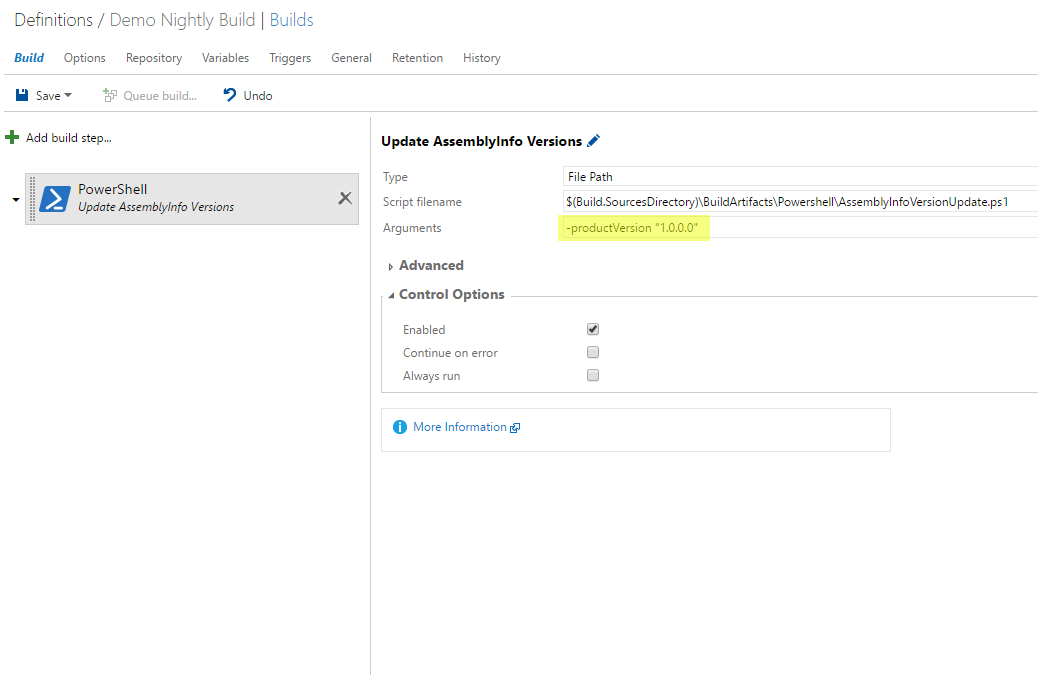
There are heaps of solutions to the versioning problem but I ended up using a script by Pieter Gheysens which basically runs through the AssemblyInfo.cs files in the workspace and updates the AssemblyInfo.cs files with the version number above. I then used the Powershell build step to execute the script. This particular version of the script requires the productversion to be passed in so the major and minor components of the version number can be determined.
![]()
You can update the actual build number in VSTS from the Powershell script by using a command like this:
Write-Verbose “##vso[build.updatebuildnumber]$assemblyFileVersion” -Verbose
![]()
Later on in the process my ClickOnce uses the version number to make a path. My WiX needs to know this path so I update a variable with this value so I can use it later like so:
$versionPath = $assemblyFileVersion -replace ‘.’, “_”
Write-Verbose “##vso[task.setvariable variable=VersionPath;]$versionPath” -Verbose
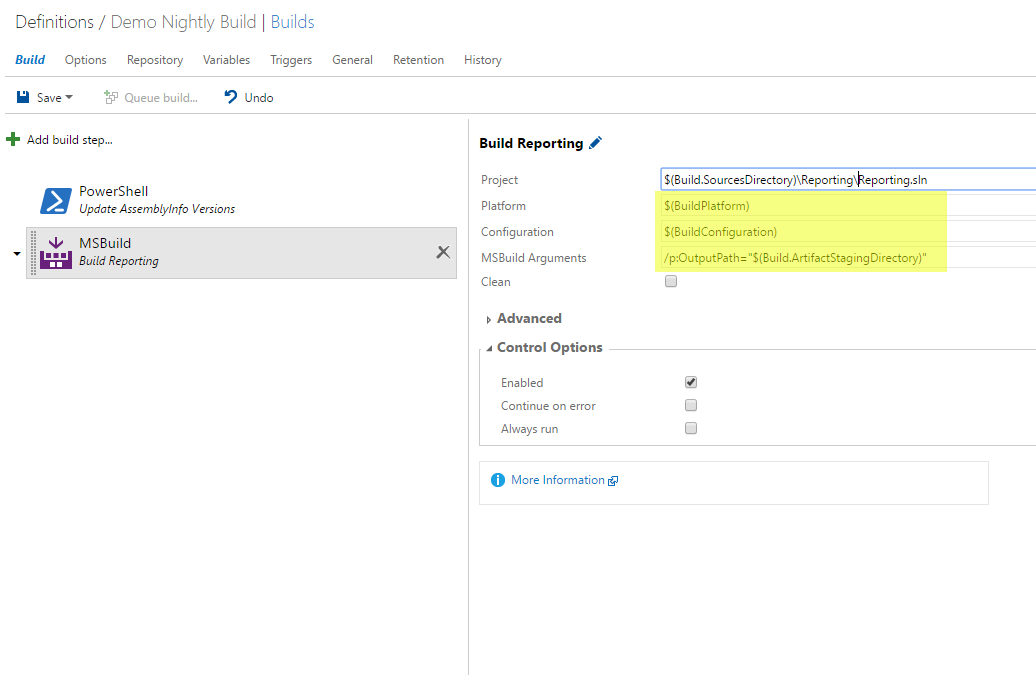
The next step was the build of the reporting component that successive components depended on. In our old upgrade template, all of the solutions were built and the output was placed in one folder together. This meant that dependencies could easily be discovered. In the new system the projects all built to their own output paths which made dependency hunting a bit more challenging. There were also a number of ways to deal with this but after a number if iterations I settled on just changing the output location of the solutions built to the artifact staging directory. I added an MSBuild build step and customised the OutputPath by passing an MSBuild argument.
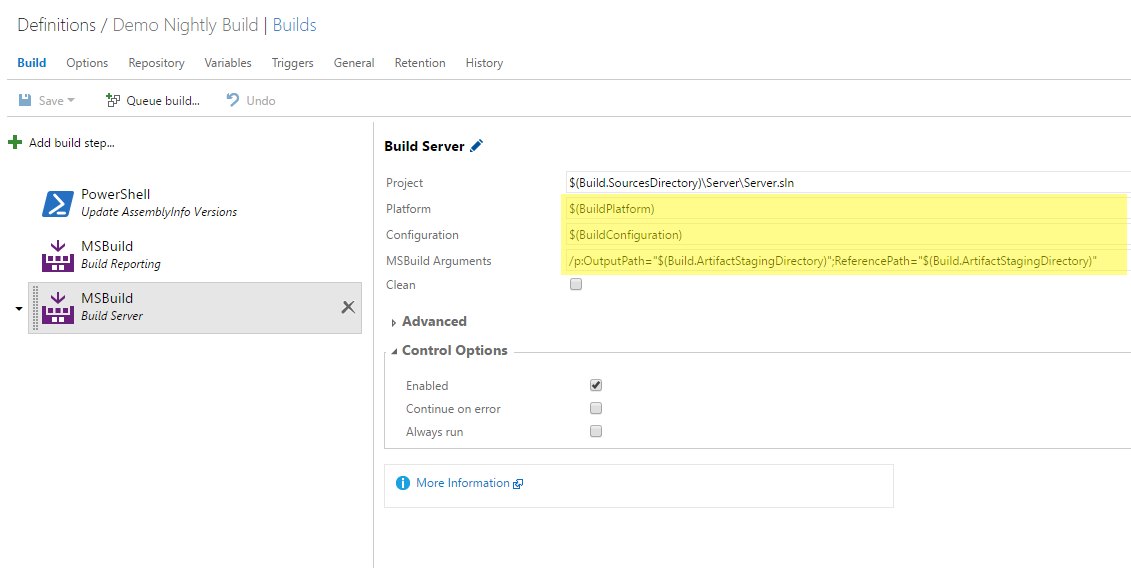
The next step required was the compilation of the server components. As these components use the reporting functionality built in the last step I had to add another MSBuild argument to help MSBuild find the dependencies. This I achieved by using the ReferencePath property as well as specifying the OutputPath so once again the output went into the shared output location.
Next comes the user interface solution. This one was a little trickier as it contains two ClickOnce deployments that need to be published as part of the build process.
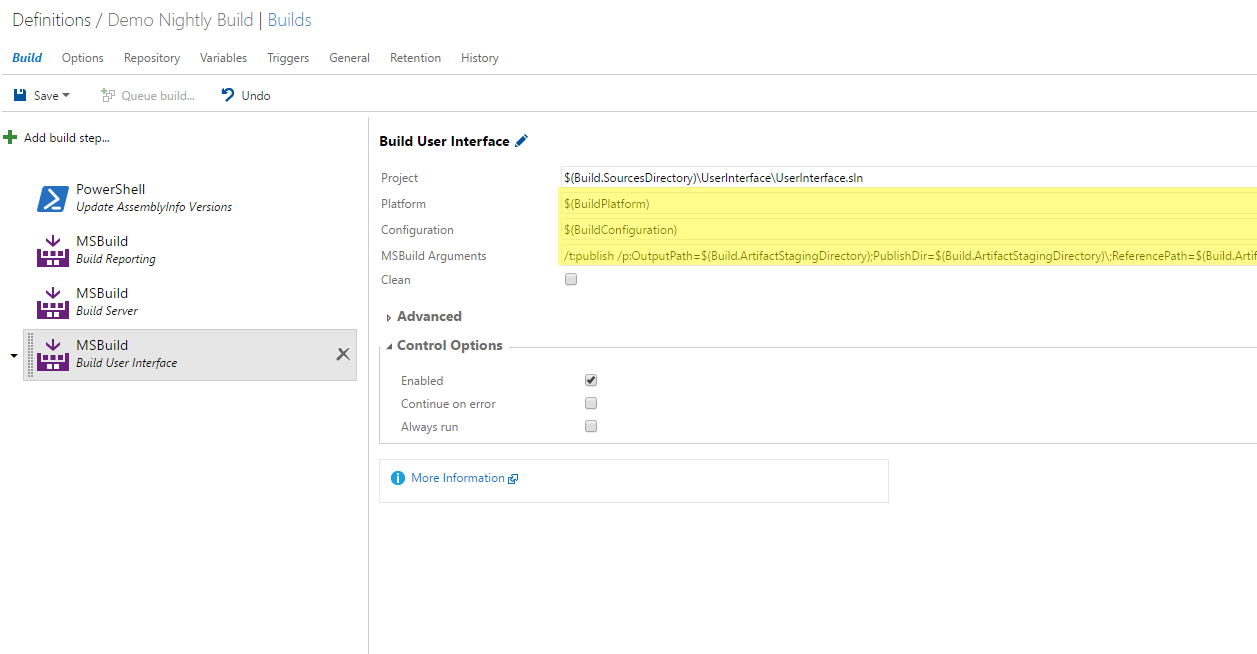
We actually include these ClickOnce deployments in the Windows Installer that installs the product. ClickOnce is then used to deploy the user interface piece out to any client computers. As we version the ClickOnce and configure its minimum required version, any update of the product will also cause the installed clients to update via the standard ClickOnce framework. As I didn’t want to rewrite any of the WiX scripts, I had to ensure the publishing of the ClickOnce went to the same place. In order to do all of this, lets take a look at the MSBuild arguments in a little more detail.
/t:publish
/p:OutputPath=$(Build.ArtifactStagingDirectory);
PublishDir=$(Build.ArtifactStagingDirectory);
ReferencePath=$(Build.ArtifactStagingDirectory);
MinimumRequiredVersion=$(Build.BuildNumber);
ApplicationVersion=$(Build.BuildNumber)
- I first specified a target of publish to ensure the solution was both built and then all supported projects within the solution would be published.
- I specified the OutputPath and ReferencePath as in the earlier steps.
- I specified the PublishDir in order to override the output of the ClickOnce deployments. If i didn’t do this the output would be under a folder called app.publish and as I didn’t want to change the WiX scripts then this wasn’t going to work for me.
- I specified the ApplicationVersion and the MinimumRequiredVersion to ensure the ClickOnce was created with the right version and that it would force an upgrade to any computers that currently had it installed when they next launched the client.
When the ClickOnce gets published it also uses the version to determine the folder structure it uses. As the WiX scripts depended on the version number I had to make sure it all linked up properly.
![]()
The backslash at the end of the PublishDir has to be there or the destination folder gets appended to the parent directory.
![]()
Be careful with using double quotes. I actually avoided using them at all as any un-closed parameters will give you some weird results.
![]()
If you do use quotes then any trailing backslashes need to be escaped by using a double backslash. If you don’t you may see errors like this:
2016-04-02T18:57:33.7258499Z MSBUILD : error MSB1008: Only one project can be specified.
The following two build steps were both web projects that needed to be included in the Windows Installer.

The challenge with these two steps was that my WiX project was expecting the output of the published websites to be in a folder name _PublishedWebsites. After some digging around on the interweb I came across this great post by Daniel Chambers. I now think I may have been able to fix it by changing the build step to a Visual Studio Build step rather than an MSBuild step. At the time though I resolved this by adding the suggested target to my .csrproj files instead. I then specified the target and the publish destination in my MSBuild arguments.
My WiX project had a few files in it that for some reason weren’t dropped to the build destination when compiling the installer. I don’t quite know why this was but instead I copied them using a Copy Files build step from the $(Build.SourcesDirectory) to the $(Build.ArtifactStagingDirectory).

![]()
Copy multiple files in a single build step by putting each one a new line.
Next was the actual compilation of the Windows Installer using WiX. I pass a number of variables into the .wixproj file when building so they can be used in the WiX template. I also specify the OutputPath to ensure the resulting installer package is dropped in the staging directory with everything else.

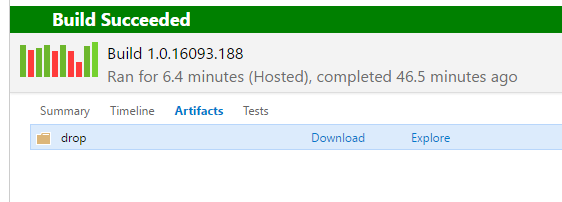
The final step ensures that all of the build output including the installer package is deployed to a drop location.

Our developers and testers can then access the built output by using the Artifacts Explorer in the VSTS portal.
That’s it. We’re all good in the hood…
Next up I’m going to explore our possibilities for dropping the built artifacts. We have other systems and users that are accustomed to accessing these from UNC paths so I’m going to investigate some options such as Azure File Storage or Azure Blob Storage. I’m sure I’ll blog about the outcome…
